Last Updated on August 23, 2022 by
Step-by-step most effective ways to remove window tint from your car
There’s an art form to the window tint removal process. In this article, we’ll walk you through exactly how to do it without damaging your vehicle and using the right techniques to peel the tint.
Top 5 Methods For Removing Window Tint From A Car

Whether you’re buying or selling a vehicle, need a different shade/percentage, or are experiencing some form of deterioration due to age or improper application, removing the existing tint is the best course of action.
But before you start pulling, peeling, and cutting, you need to come up with a plan.
Removing window tint is something that you can do, but you’ll need to be strategic about how you do it. There’s a right and a wrong way to peel the tint.
Let’s walk through some of the proper steps for effectively removing tint.
#1 Heat Removal Method
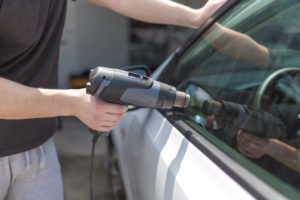
If you have a heat gun or hairdryer on hand, this is an easy, mess-free method worth trying. Here’s how it works:
- With the heat gun set on the highest setting, hold it approximately two inches away from the glass, on the outside of the window. Begin in one corner of the window and apply heat for roughly 30 seconds. At this point, you should notice the corner start to peel up.
- Once a corner starts peeling, use a finger or razor blade to pry the film off the glass. Next, use the heat gun to apply heat at the point where the peeling tint meets the glass and begin slowly peeling it back until the entire sheet is completely removed.

This method tends to work well for tint that’s still in good shape. Old tint may rip or tear, leaving behind small specks.
Pro Tip: Nail Polish Remover – Believe it or not, nail polish remover can be a great method for removing those stubborn lingering tint specks or for helping to release the leftover tint glue adhesive that is still on the window. The chemicals act as a very effective adheisve remover.
#2 Soap & Scrape Method (Soap Solution)
The soap and scrape method is one of the most commonly used techniques.
And while it requires more supplies and manual effort than the heat method, it often leaves a cleaner and more polished result.
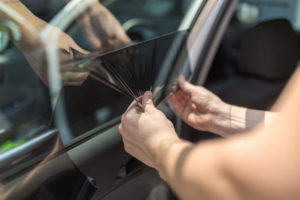
This method requires dish soap, glass cleaner, microfiber cloths, a razor blade, spray bottle, paper towels, garbage bags and water. You start by making a cut in the corner of the film. This creates a small tab that you can use to lift the film off the window. Using this tab, start peeling the tint back. (Note: The tint film won’t always peel off in a single piece. You may need to make multiple cuts and tear off in sections.)
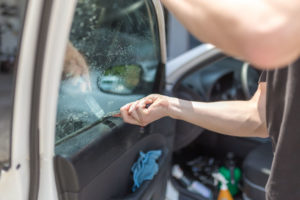
Once the window tint glue is removed, prepare a soapy water mixture inside of a spray bottle and apply it to the windows. Grab your razor blade and carefully scrape the remaining adhesive. (Make sure you use light passes. Don’t dig into the glass or you could create permanent scratches.) Finally, clean the window with glass cleaner and microfiber cloths.
#3 Soapy Newspaper Method
If other methods don’t work, you may give the soapy newspaper method a try. It’s similar to the soap and scrape technique, but doesn’t require nearly as much manual effort. You’ll need all of the same supplies plus newspapers.

With this method, you create a mixture of warm water and dish soap in a bucket and then apply it to the inside of the window. Immediately after applying the soapy water, you’ll want to lay the newspaper on top of your wet windows. Allow the soap and newspaper to sit for roughly an hour.
If the newspapers appear to dry up, you can apply some additional soapy water on the outside. (You may need to do this every 15 or minutes.)
After 60 minutes have passed, the newspaper has had a chance to act as an adhesive remover and you can now use your razor blade to peel the newspaper up.
If the method has worked, the top layer of the tint will pull up as well. You can then rub off the remaining layers of film with your blade and clean the glass.
#4 Steam Clean Method
If you have a fabric steamer cleaner like this PureSteam on hand, this is arguably the easiest and most effective method of removing window tint.
You simply use the fabric steamer to steam the inside and outside of the windows for a few minutes and the tint glue residue shoudl melt away.
As it melts, you can use a razor blade to get it going and then the tint peels right off. This leaves you with nothing more than a little bit of leftover adhesive to wipe off. The steamer method is highly recommended.
#5 Solar Peel Method

The solar peel method is the fifth option people commonly use to remove window tint. This can be an intricate and time-consuming method, but it’s also the most interesting. Here’s how it works:
- Spray the outside of the window with soapy water and then cover with a black plastic trash bag. Take your time and smooth the bag out until it’s completely flat and free of bubbles and wrinkles.
- After all windows are covered, use a tarp or other cover to protect interior surfaces near the windows.
- Spray an ammonia solution on the inside of the windows and cover it with another trash bag. (Wear a mask and don’t breathe in the fumes.) Let the windows bake in the hot sunlight for at least 20 to 25 minutes and then remove the black trash bags.
- Grab a corner of the film and slowly peel the tint away from the glass. A scraper or using a razor blade remove window tint glue, any of the leftover film and any remaining adhesive.
If the other techniques don’t work, the solar peel method should do the trick. It’s best to use this method on a warm, sunny day. Start slow and work in small areas at a time.

8 Common Reasons for Removing Window Tint
As nice as window tinting can look – and as intricate as the application process is – why would anyone ever want to remove old window tint?
Well, there are plenty of reasons. And if you’re reading this article, one of the following likely resonates with you:
1 You Are Buying a Vehicle
Some people simply don’t like the look of tinted windows – or the specific kind of tint might not fit their style. If you’re purchasing a pre-owned vehicle from an individual or dealer and don’t like the tint on the car, removing it is always an option.
2 You Are Selling a Vehicle
If you’re selling a vehicle, you want it to look as nice as possible. Old tint can look raggedy and may detract from the other features of the car. By removing the tint, you eliminate an eyesore and let the vehicle speak for itself.
3 Your Current Film Is Too Dark (Illegal)
Every state has its own window tint percentage laws that dictate how dark tinting can be on windows and windshields. There may also be other restrictions related to reflectivity and coloring. If you discover that your vehicle breaks laws, you’ll need to remove the old window tint.

4 Prefer a Different Tint Shade
Most people like tinted windows, but the percentage is a matter of personal preference. There’s a huge difference, for example, between 70 percent tint and 27 percent tint. In order to change to a new shade, you have to first remove the old window tint.
5 Poorly Applied Window Tint
As mentioned, window tinting is both a technical process and an art form. If your window tint was applied by an amateur – or done poorly by a professional tint shop – it’ll need to be removed so that you can start over.
6 Your Window Film Is Peeling
When tint doesn’t properly adhere to the glass, any number of issues can occur. Peeling occurs at the corners of the window and worsens over time. The only way to truly restore a clean and professional look is to remove the tint and start fresh.

7 Your Window Film Is Bubbling
Everyone has seen an old vehicle with bubbling tint. It looks horrible and, unfortunately, there’s no way to fix it. Bubbling can be a sign of poor installation, but is also a symptom of failing adhesive. Eventually, most window tint will show signs of bubbling.
8 Your Window Film Is Experiencing Discoloration
This is another sign of aging. Over time, tint has a tendency to turn a purplish hue. Not only does this alter the look of your windows, but it actually diminishes the tint’s ability to block out harmful UV rays. Once discoloration occurs, it’s impossible to revert back to the original color without replacing it.
Cleaning And Restoration Tips After Window Tint Removal
Regardless of which method you choose to remove your window tint, you’ll likely be left with less-than-perfect windows. You may have a combination of adhesive, residue, specs of tint, and even tiny, surface-level scratches. To achieve a new glass look, you’ll need to apply some additional elbow grease…don’t forget your spray bottle and soap and water, too!
The best method is to purchase some new #0000 steel wool. (It’s really important that you go with #0000, as anything higher could lead to permanent scratches in your glass.) Then, in a bowl, mix together some dish detergent with warm water. Dip the steel wool into the soapy solution and lightly rub the windows. Small circular movements are ideal. Avoid using too much pressure and/or large sweeping movements.
Once all adhesive, residue, dirt, and debris has been removed, use glass cleaner and a microfiber cloth to achieve a dry, pristine finish.
Make Sure Your Tint Follows The Window Tint Laws In Your State
If you found this article informative, helpful, and engaging, you may be interested in occasionally receiving updates when we post other articles, guides, and posts related to window tinting and window tint laws by state. To get the latest updates, please sign up for our email list!
